Code Jumper Curriculum: Lessons, Lesson 2 Sequencing and Algorithms
American Printing House for the Blind
Code Jumper Curriculum: Lessons
Copyright © 2020 American Printing House for the Blind
All rights reserved. No part of this publication may be reproduced, stored in retrieval system, or transmitted in any form or by any means, except as expressly permitted under copyright law, without written permission of the publisher.
Published by American Printing House for the Blind
1839 Frankfort Avenue, Louisville, KY 40206
www.aph.org | [email protected]
Overview
Lesson Objectives
After this lesson, students will be able to design a simple program that uses a sequence of commands.
Expected Outcomes
- All students: will be able to create a sequence of commands with at least two Play pods
- Most students: will be able to create a sequence of commands with at least three Play pods and set their sounds
- Some students: will be able to create a sequence of commands that produces a musical scale or words in a song
Lessons Plan Structure
- Unplugged Activity
- Guided Code Jumper Activity
- Exploration
- Standards and Check for Understanding
Resources
- Code Jumper Tutorial Videos
- Code Jumper App: https://www.youtube.com/watch?v=vg72YPz6CWY
- The Hub: https://www.youtube.com/watch?v=KGb51PW9zJQ&lis=
- Play and Pause Pod: https://www.youtube.com/watch?v=446jCw8qcDI&t=
- Code Cards
Key Vocabulary
- Sequence: a sequence is where one action is followed by another action.
- Algorithm: A step-by-step process to complete a task.
- Command: An instruction for the computer. Many commands put together make up algorithms and computer programs.
- Computer Program: An instruction for the computer. Many commands put together make up algorithms and computer programs.
Materials
- Preload Sound Categories in the Code Jumper app.
- Thread 1: MIDI instruments : Piano
- Thread 2: Sample Sounds: Nature
- Sample program set up and run by the teacher: Musical Scale
Unplugged Activity: Creating a Sequence
Objective
Introduce the students to the idea of how individual actions can be performed in order to complete a task.
Vocabulary
Introduce
Materials
Index cards one per student, pen/pencil or other form of writing, chairs
Instruction
- Set up a line of chairs (one for each student). If you have a larger group of students you may want to select a group of five or six students to perform this task with the rest of the class observing and participating in the discussion.
- A student with a visual impairment will not be able to observe what is happening, instead have all the students group up by either their table groups or in groups of 5-6’s to ensure that all students can share in the experience.
- Ask the students to think about what they do in the morning to get ready for school. Possible steps could be:
- Wake up
- Brush teeth
- Get dressed
- Comb hair
- Eat breakfast
- Take the bus to school
Add as many steps as needed for students in the line of chairs.
- Write each step on an index card. This can be done by the teacher or the students. Have the students announce what task they have.
- Ask the students to remember their task and set the cards down.
- The students should join hands. When the teacher says “run,” the first student will say the task that they were given and then squeeze the hand of the next student in line, who says the word on their card and then squeezes the hand of the next student in line, and so on. This process is repeated until the end of the line is reached.
- An alternative strategy is for the students to hold their cards and touch elbows with the person next to them. Instead of squeezing hands the student can lightly nudge the elbow of the student next to them. This will provide them the ability to hold onto their cards and still conduct the activity.
- Explain that an algorithm is “a step-by-step process to complete a task”. A simpler way of saying this for younger students is to describe it as “a list of steps to complete a task”.
- Explain that this activity is similar to running an algorithm and that each student represents an instruction in the algorithm.
- Have two students stop drop hand or stop touching elbows (that is, break the connection between them), then ask the students what they think will happen when the algorithm runs. (Expected response: It will stop at the break.)
- Have two students change places (this will change the order of the commands), then ask the students what they think will happen when the algorithm runs. (Expected responses: the task will not be done in the right order or sequence)
- The students should run the algorithm again to test their predictions.
- Explain that they have created a type of algorithm called a sequence, which is a set of instructions, or commands, that are carried out one at a time in the order they appear.
Guided Activity: Creating a Sequence with Code Jumper
Objective
Introduce the Play pod and have students combine pods to create a sequence of sounds.
Vocabulary
- Sequence: a sequence is where one action is followed by another action.
- Algorithm: A step-by-step process to complete a task.
- Command: An instruction for the computer. Many commands put together make up algorithms and computer programs.
- Computer Program: An instruction for the computer. Many commands put together make up algorithms and computer programs.
Materials
Code Jumper Kit: Hub and 8 Play pods
Instruction
- Explain that an algorithm is different from a computer program. An algorithm is a set of steps that can be carried out by a human or turned into a computer program. A computer program is “a set of instructions to tell a computer to do a task.” In order to turn algorithms into computer programs, we need to use code.
- Introduce Code Jumper. Remind students that it is a physical programming tool and that it lets us program by using physical pods rather than by typing text into a computer.
- Open one of the Code Jumper kits and hand each student or group one of the Play Pods. Ask them to hold the pods in their hands inspect them.
- Once each student has a Play Pod and they have had time to inspect them ask them to describe its appearance and guess what it does. Explain that each pod is a command in a program and can be connected with other pods to form a sequence.
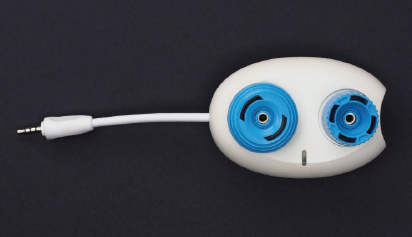
[Figure Caption:] A photo of one Play pod - Ask the students how many dials the Play pods have (two). What color are the dials on the Play Pods (blue). What do the dials feel like (One is fatter and shorter, shaped like a doughnut, than the other with ridges that go around the dial. Another is skinnier and taller with ridges that go up and down along the outside of the dial).
- Tell the students to hold the pods up to their ears and slowly turn the dials so that they can hear each individual click as the dial rotates. Explain that each click of the dial causes the pod to do something slightly different.
- Have the students to put their hands on the Hub and ask them to describe what they find on it. Tell them the Hub is the part of Code Jumper that communicates with the computer and produces sound as well as where start and stop the program. (See the Hub tutorial video for description and explanation of all parts of the Hub.) Explain that all programs start at the Hub and then follow each of the pods that come out of the Hub.
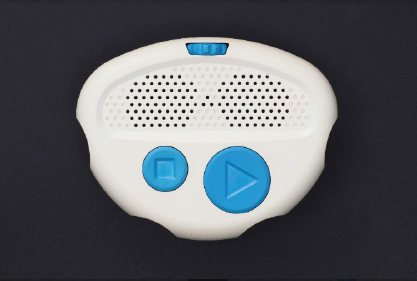
[Figure Caption:] A photo of the Code Jumper Hub - Introduce students to the Code Jumper app. The Code Jumper app is the program that communicates with the Hub and tells what pods are plugged into the Hub and what the dials are turned to on the connected pods.

[Figure Caption:] This is a screenshot of the Home page of the Code Jumper app. It shows the Code Jumper logo, six buttons, and four threads, each displaying the name of a sound set. The buttons, from left to right, read: Bluetooth, Sounds, About, Play, Read, and Stop. The names of the sound sets, from left to right are: Twinkle, Twinkle; Percussion; Cowboy Country; and Animals. - Have the students to create their first program by plugging one Play pod into Port 1 on the Hub. Select Thread 1 and select Sample Sounds: Animals. Have the students turn the short dial to Cat and taller dial to 1 times speed.
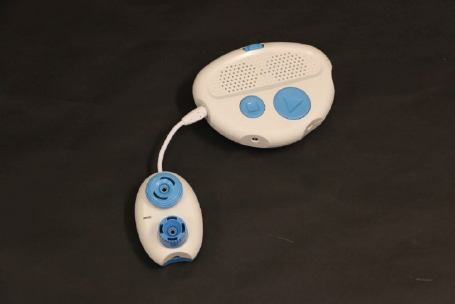
[Figure Caption:] A photo of a Play pod connected to the Code Jumper Hub at Port 1 - Point out the sound that is played when pods are plugged into the Hub. Show them that the sound they are hearing matches the text that appears in the Code Jumper app. (Note: Threads will be defined in the Data lesson.)
- Have the students press the Play button on the Hub. Explain that this is how they run the program they created.
- Introduce to the students the technique of “tracing the code”. This is a technique where the programmer follows the pathway of the code as the program is run.
- Have the student start with their hand on the pod connected to the Hub and touch each pod as it plays the sound.
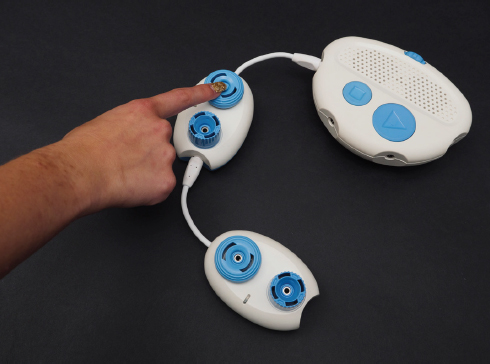
[Figure Caption:] This is a photo of the Code Jumper Hub and two Play pods. One Play pod is connected directly to the Hub at Port 1, and a second is connected to the opposite end of the first Play pod. A child’s hand is pointing to the first Play pod, indicating tracing the code. - Ask the students if they can figure out how to change which sound is played by a pod and how long that sound is played. Let them make changes using both dials on the Play pods and have them identify what each dial does.
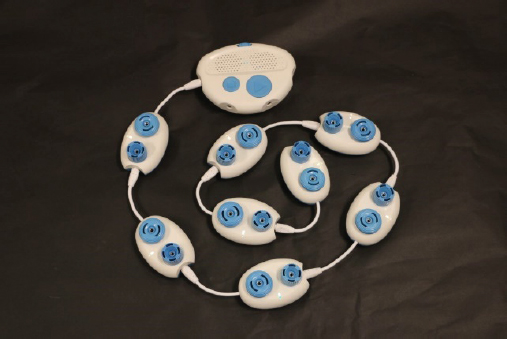
- Have students connect three more Play pods to the first pod and run the new program. Ask the students if they can determine the order of the pods being played. Let them know that a program always starts from the Hub and that the pods are played one after the other, in clockwise order. Students should trace the program by starting with their hands on the Hub and then touching each pod as they hear the sound each pod makes.
- Now that students have a basic understanding of how to connect the pods and what the app is, ask the students to create their own sequence using three or more pods. They can change the sound set to Twinkle, Twinkle and recreate the song.
Closure
- Explain to the students that each pod in their program represents one line of code.
- Ask the students how many lines of code they wrote today.
- Share this Fun Fact: Microsoft Windows is made up of 50 million lines of code!
Exploration/Challenge
Objective
Students will create a program with eight Play pods, set the sounds on each pod, and run and trace the program.
Vocabulary
Students
Materials
- Code Jumper Kit
- Sequence and Algorithm Exploration Code Card
Instruction
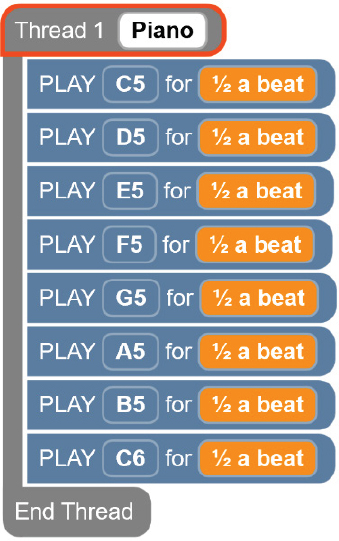
The teacher sets up and runs the Musical Scale program as follows: First, in the Project Code Jumper app, set the sound category of Thread 1 to Sample Sounds and the sound set to Piano*. Then, connect eight Play pods to Port 1 on the Hub. Finally, adjust the dials on the pods so that they play the following sounds in order:
THREAD 1 Piano
PLAY C5 for 1/2 beat
PLAY D5 for 1/2 beat
PLAY E5 for 1/2 beat
PLAY F5 for 1/2 beat
PLAY G5 for 1/2 beat
PLAY A5 for 1/2 beat
PLAY B5 for 1/2 beat
PLAY C6 for 1/2 beat
END THREAD
* See note in User Guide about MIDI Instrument note naming.

- Run and trace your program, touch each pod as you go.
- Ask the students how many pods they will need to recreate scale (8).
- Ask the students to recreate the program using the Code Jumper kit.
- Encourage the students to slowly create the program and run the program after each change, tracing the program after each pod is added or modified. By having the students slow down and systematically create the program they will develop good habits for future lessons.
Closure
- Once the students feel that they have accurately reproduced the program have them write the sequence in their computer journal. On each line they should have a single play pod and the note followed by the note duration.
Standards and Check for Understanding
CSTA Standards*:
- 1A-AP-08: Model daily processes by creating and following algorithms (sets of step-by-step instructions) to complete tasks.
- 1A-AP-12: Develop plans that describe a program’s sequence of events, goals, and expected outcomes.
- 1B-AP-10: Create programs that include sequences, events, loops, and conditionals.
National Curriculum of England*:
Key Stage 1:
- Understand what algorithms are; how they are implemented as programs on digital devices; and that programs execute by following precise and unambiguous instructions
- Use logical reasoning to predict the behavior of simple programs
Key Stage 2:
- Use sequence, selection, and repetition in programs; work with variables and various forms of input and output.
- Use logical reasoning to explain how some simple algorithms work and to detect and correct errors in algorithms and programs.
- Use technology safely, respectfully and responsibly; recognize acceptable/unacceptable behavior; identify a range of ways to report concerns about content and contact.
Closing Activities and Check for Understanding
Have students write down, touch-type, or verbally give a sequence of instructions for an everyday activity in their Computer Science Journal.
Possible examples:
- Feeding a pet
- Tying shoes
- Setting a table
- Getting dressed
- Cleaning your room
- Getting ready for bed
The students should be able to break the examples into steps and order the steps in a logical sequence.
| Check for understanding | Completed |
|---|---|
| Students can identify an everyday activity that consist of sequential steps and order the steps in a logical sequence. | Yes / No |
Code Cards
Algorithm Exploration Code Card
THREAD 1 Piano
PLAY C5 for 1/2 beat
PLAY D5 for 1/2 beat
PLAY E5 for 1/2 beat
PLAY F5 for 1/2 beat
PLAY G5 for 1/2 beat
PLAY A5 for 1/2 beat
PLAY B5 for 1/2 beat
PLAY C6 for 1/2 beat
END THREAD
![]()
For more resources, visit codejumper.com
Copyright © 2020
![]()
1839 Frankfort Avenue
Louisville, Kentucky 40206
502-895-2405 • 800-223-1839