
Code Jumper Curriculum: User Guide
American Printing House for the Blind
WARNING: Choking Hazard—Small Parts. Not intended for children ages 5 and under without adult supervision.
Code Jumper Curriculum: User Guide
Copyright © 2020 American Printing House for the Blind
All rights reserved. No part of this publication may be reproduced, stored in retrieval system, or transmitted in any form or by any means, except as expressly permitted under copyright law, without written permission of the publisher.
Published by American Printing House for the Blind
1839 Frankfort Avenue, Louisville, KY 40206
www.aph.org | [email protected]
Table of Contents
- 1. Introduction
- 2. Code Jumper Features
- 3. Code Jumper Components
- 4. Threading
- 5. Troubleshooting
- 6. Tips and Tricks
- 7. Frequently Asked Questions
- 8. Try It Yourself!
- FCC Compliance Statement:
- ISED Compliance Statement:
- RF Exposure Compliance Statement:
1. Introduction
1.1. Welcome to Code Jumper!
Code Jumper helps students build the skills necessary for a modern workplace. Students will utilize flexible and computational thinking as they question, predict, experiment, and apply fundamental programming concepts in a concrete and tangible way. Code Jumper was originally designed by Microsoft, and was developed by the American Printing House for the Blind.
Code Jumper was developed to help address barriers for students with visual impairments who want to learn to code. Rather than requiring students to write code in text, Code Jumper enables them to create code by physically connecting command pods and setting parameter values.
You might think it would be hard to learn, or teach, programming without any previous experience, but it is quite easy – and fun! You can teach it, and every child can learn it. Let’s get started!
1.2. How does Code Jumper work?
Code Jumper works by physically joining together Command pods to create a sequence of code. Usually, a program is made up of written commands, but each of the Code Jumper command pods functions like one of those written commands. A line of code also appears in the Code Jumper app every time that a Command pod is connected to the Hub. By pressing Play on the Hub or in the app, the sounds are played in the order they were sequenced. Trial and error can continue as students test their theories either physically with the Command pods, or by reading the screen, which is accessible to screen-readers, screen magnification software, and high-contrast settings.
1.3. System Requirements
Use of Code Jumper requires a computer or tablet running the Windows 10 operating system (version 1803 or above). To determine your version of Windows, click the Start button. In the resulting command field, type “winver” and press Enter.
1.4. Set Up Code Jumper
- Download and install the free Code Jumper app from the Microsoft Store. To download, open the Microsoft Store app on your computer and sign in. (If you don’t have a Microsoft Store account, you need to create one first.) Then search “Code Jumper,” and press Install.
- Remove the cover on the back of the Code Jumper Hub and insert four AA batteries (batteries not included).
- Turn on the Hub and connect it to your Windows computer via Bluetooth. This is usually done by pressing “Add Bluetooth or Other Device” in the Bluetooth settings of your computer. (For help, refer to online instructions on how to connect Bluetooth devices to your specific system and computer.)
- Once it is connected, all computer sound might be routed to the Hub; if so, your screen reader, music, and other audio will play from the Hub. You can change the playback device by going to the Speakers/Headphones settings on your computer. Make sure your computer is not muted.
- If you have multiple Code Jumper units, it is recommended that you tactually mark the Hub and its associated computer so you will be able to distinguish the appropriate pairs later. Note that you can only connect the Hub with one device at a time.
- Open the newly installed Code Jumper app. Make sure the Hub is still on. Wait a few seconds to allow the Hub to connect to the app. You will hear a clicking sound once the connection is set.
- For questions regarding setup, see Troubleshooting.
2. Code Jumper Features
- Auditory in nature: students can make their own sounds or use pre-set sounds, musical notes, songs or voiced stories.
- Physical components are used in combination with the Code Jumper app.
- Accessible for students with blindness who need to use screen-reading software, as well as for students with low vision who have unique layout needs
- Conducive to collaboration and team work, and can also be operated independently
- Students will learn about computer systems, computer programming, algorithms, threads, sequences, repetition, selection, parameters, constants, variables,
- Network topologies, protocol, binary numbers, decomposition, and debugging.
- Ages 7-11 (or older) who have never learned coding.
3. Code Jumper Components
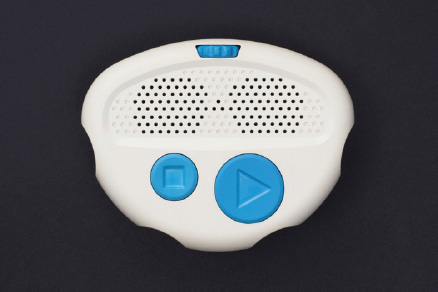
3.1. The Hub Is Where It All Begins
The Hub has two buttons, Play and Stop, and four ports along the edge that allow Command pods to be plugged into it.
When the Hub is placed with the ports adjacent to your body, the ports are numbered from left to right as 1, 2, 3, and 4. The Hub is white and features a blue Volume dial in the bottom-center area, and a blue Play button and a blue Pause button in the top-center area.
Play Button — A blue triangle-shaped button that plays the program’s sounds, also known as “running the code.”
Stop button — A square-shaped button that stops the program from running.
Play and Stop buttons pressed together — The program is read aloud, also known as “listening to the code.”
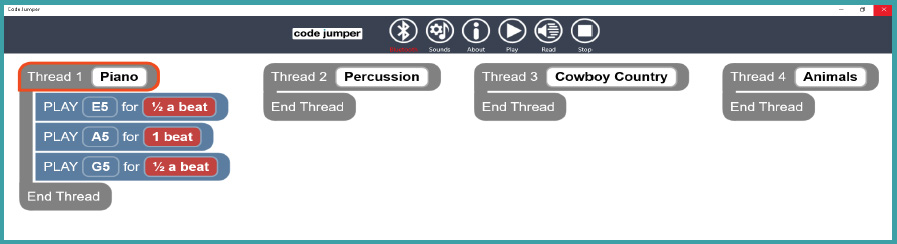
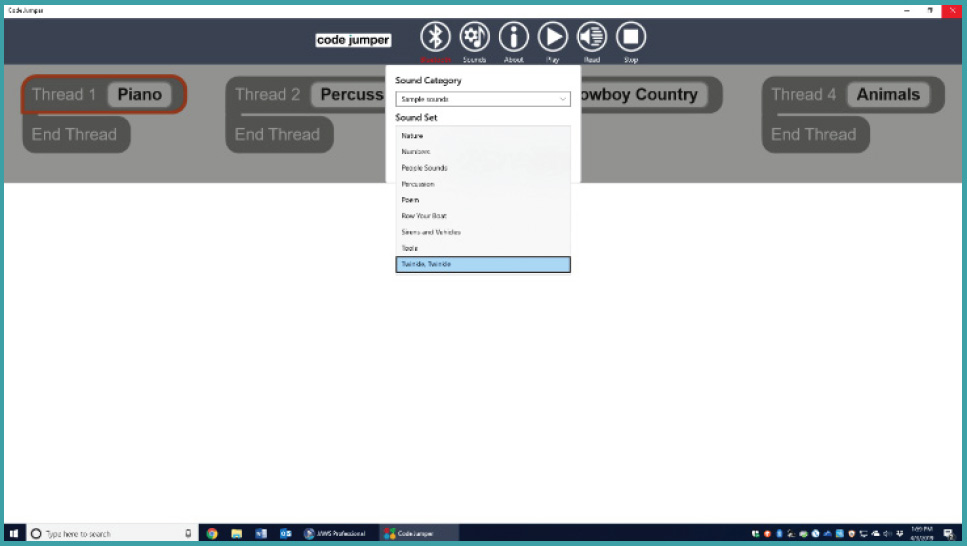
3.2. Code Jumper App
The Code Jumper app screen has six icons on its menu bar. From left to right, they are:
- Bluetooth symbol (Hub-connection indicator),
- Musical note and gear (add custom sounds),
- Lowercase i (about),
- Right arrow (play the program),
- Megaphone (read code aloud), and
- Square (stop the program)
Below the menu bar are four threads of code in four columns. They correspond to Ports 1, 2, 3, and 4 on the Hub respectively.
The first column in the screenshot shown below shows the commands for a three-pod program playing the notes E5, A5, and G5.
Users who use screen-reading software may use the keyboard to navigate through the Home page of the app. Use the Left and Right arrow keys to quickly switch between threads, and the Up and Down keys and the Tab key to move item by item within a thread.
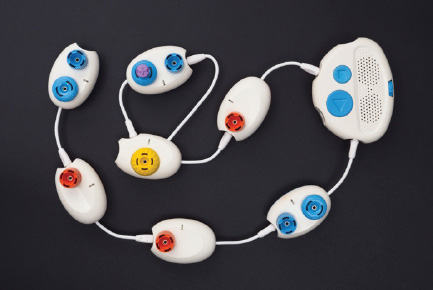
3.3. What Are Command Pods and What Do They Do?
Command pods function like lines of written code, and each one carries out a different type of command. There are five different Command pod types, and all Command pods are white and a secondary color, as described below. Each pod is shaped like a computer mouse.
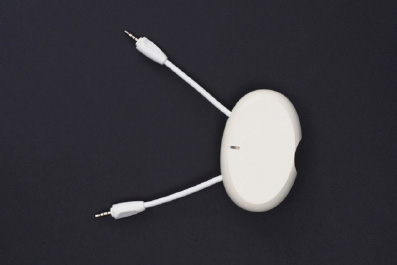
3.3.1. Play pod (8)—Two blue dials
On the Play pod, a wire extends from one end; there is a port in the opposite, notched end; and the top has two blue dials.
Sound dial—The flatter, doughnut-shaped dial changes the sound that is played. To change the sound options available, use the Code Jumper app to adjust the sound categories and sound sets. You can even add your own sounds!
Duration dial—The taller, ridged dial changes the duration or speed of a sound. For sounds under the MIDI Instruments sound category, this dial changes their duration to 1/4 beat, 1/2 beat, 1 beat, or 2 beats. For other sounds, this dial changes their speed to 0.5 time speed, 1 times speed, 1.5 times speed, and 2 times speed.
If the sound is under the MIDI Instruments sound category, changing the duration of the sound will not affect the pitch. For other sound categories, however, changing the duration stretches or squashes the sound, which changes the sound’s pitch.

3.3.2. Pause pod (3)—One orange dial
The Pause pod enables you to create a delay between two sounds in the middle of a sequence of code. The pause can range from 1/4 beat to 2 beats. Like the Play pod, the Pause pod has a wire extending from one end and a port in the opposite, notched end. It has only one tall-ridged dial, which is orange.

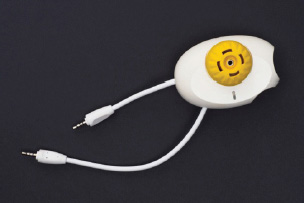
3.3.3. Loop pod (2)—One yellow dial
On the Loop pod, two wires—one longer than the other— extend from one end; the opposite, notched end houses two ports; and the flat-donut shaped dial is yellow.
- The Loop pod repeats a set of commands by adjusting the dial to the number of times you wish to repeat the commands.
- Place the Loop pod with the wire connectors on the left. The shorter wire connector is where the main program enters the loop.
- The lower-right port is where the loop begins, and it will be carried out clockwise to the Loop pod’s longer wire at the end of the loop.
- When the loop is finished, the program will continue with whatever is connected to the upper-right main port.
- When connecting command pods that you want repeated to the Loop pod, start by plugging the first of those command pods into the lower-right port of the Loop pod. Then, close the loop by connecting the longer wire of the Loop pod to the port on the last of those command pods.
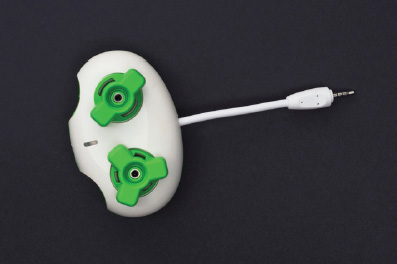
3.3.4. Selection pod—Two green, gear-shaped dials - one with two spokes and one with three spokes
The Selection pod has a wire extending from one long edge, two ports on the opposite edge, and two gear- shaped dials.
- The Selection pod allows different paths to be taken through a program depending on the values set on its two dials.
- Each dial has a port related to it. Both dials can be set to any value between 1 and 8.
- If the number on the two-spoked dial is greater than the number you set on the three-spoked dial, the program will take the path of the two-spoked dial; otherwise, the program will take the path of the three- spoked dial.
- This is called an if/else statement in coding.
3.3.5. Merge pod (1)—green, with no dials
The Merge pod is solid green with two wires extending from one long edge and a single port in the opposite, notched edge.
- The Merge pod allows two paths from the Selection pod to join back together. Connect the ends of the two paths from the Selection pod to the Merge pod’s two wires.
- If you want to continue the program, connect the next command pod in the program to the port on the Merge pod.
- After the path from the Selection pod has been played, the program will continue to play anything that comes after the Merge pod.
3.4. What Are the Plugs Used for?
Plugs are used to override the value set on the dial in which it is inserted. There are five types of plugs:
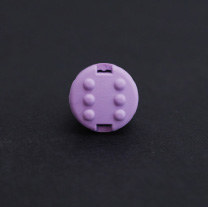
3.4.1. Constants (8)—purple, with raised dots
A Constant plug is used to set a Command pod’s dial to a fixed value by inserting it into the dial. Constant plugs can be used with a Loop pod, a Selection pod, the Play pod’s Sound dial, and can be used to assign values to the Variable plugs.
3.4.2. Random (1)—purple, with raised letter R
The Random plug is used to change the value to a random value between 1 and 8.

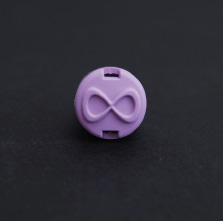
3.4.3. Infinity (1)—purple, with raised infinity symbol (∞)
The Infinity plug is used to change the value in a Loop pod to infinity. This will run infinite loops until the Pause button on the Hub is pressed.
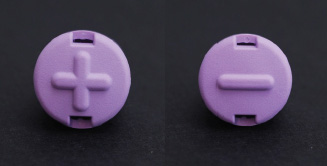
3.4.4. Counters (2)
Plus plug—purple with raised plus sign
Minus plug—purple with raised minus sign
- The order of the sounds in each sound set on a Play pod is fixed, with a number assigned to each one. The Plus plug increases the value you set on a Play pod’s Sound dial by 1, and the Minus plug decreases that value by 1.
- A Counter inserted into the Sound dial on the Play pod will read the next or previous sound in the sound set, respectively.
- If a Plus plug or a Minus plug is inserted into the Sound dial on a Play pod that’s inside a Loop; this changes the sound to the next sound or previous sound in the sound set each time the loop repeats.
3.4.5. Variables (3)—large gray plug with connector port
- Variable plugs store a value for use later in the program. Set the variable by adding a constant into the Variable plug.
- All Variable plugs that occur later in the program will take the value of the Variable plug set before it.
- Variable plugs can also be used in combination with Counter plugs, enabling you to increase or decrease the value stored in the variable for each repetition of the commands.

3.5. Extender Cable (1)
The white Extender Cable has a plug in one end and a port in the other. It is used when extra space is needed to connect pods together in complicated programs (e.g. nested loops). To use this cable properly, connect pods to its port before connecting its plug end to other pods or the Hub.

3.6. Sound Sets
3.6.1. Pre-Recorded Sound Sets
Each connector on the Hub can have a different group of sounds assigned to it. Sound sets have up to 8 related sounds and will play on the string of commands that are plugged into that port on the Hub. The order of sounds in a sound set is fixed and has a number associated with it. Sound sets assigned to the connectors can be changed in the app. They are located next to the thread number.
Note About our Piano and other Musical Sound Sets: Some of our musical sound sets were built using MIDI instruments. The “note names” (C4, C5, etc.) shown in the Code Jumper app, reflect the MIDI instrument notes. So while on a traditional piano, we know Middle C as C4, in MIDI language, there are 60 notes instead of 88, so Middle C becomes C5.

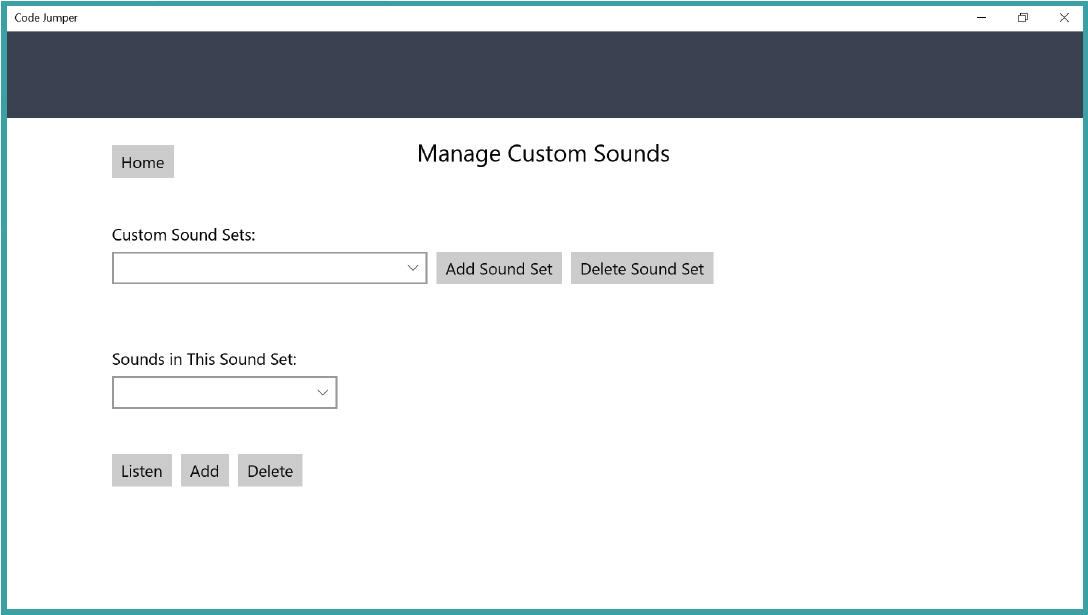
3.6.2. Adding in Custom Sounds
To add your own sounds, create a custom sound set and then add sounds to it.
3.6.2.1. Create a Custom Sound set
- Click the musical notes icon on the Home page menu bar.
- Click the Add Sound Set button next to the Custom Sound Sets dropdown list.
- Type a name in the Enter Sound Set Name text box that appears.
- Click Done.
3.6.2.2. Add a Custom Sound
- Select the first empty sound slot in the Sounds In This Sound Set dropdown list, then press the Add button.
- Type a name for your sound in the text box.
- Press Add Sound File to choose a .wav or .mp3 file.
- Press Done. Focus will automatically move to the next item in the sound dropdown list allowing you to add the next sound.
- To listen, edit, or delete an already added sound, move to that sound in the sound dropdown list and press the buttons.
- Press Home to go back to the Home page of the Code Jumper app. Your sound sets will be visible under the Custom Sounds category, and you can use them in your programs.
4. Threading
Each port on the Hub can have a set of Command pods connected to it. Each set is called a thread and will run at the same time. This allows two or more types of sounds to be played at the same time, such as the melody and harmony in a song.
5. Troubleshooting
How do I know if the Hub is connected to the Code Jumper app?
If the Bluetooth icon in the Code Jumper app (leftmost icon on the top-right of the screen) has a red box around the Bluetooth symbol, the Hub is connected to the app. Users who use screen reading software will hear “Bluetooth Connected” when moving keyboard focus to that icon. If you do not see a box around the Bluetooth symbol, the connection failed and you can try one of the following:
- Close the Code Jumper app, restart the Hub, and then reopen the app to try connecting the Hub again.
- Make sure that the Hub is connected to the computer via Bluetooth. This should be done in the Bluetooth settings of your computer. You can find instructions online for how to set up Bluetooth on your particular computer.
- Make sure your computer is using the Windows 10 operating system (version 1803 or above). To determine your version of Windows, click the Start button. In the resulting command field, type “winver” and press Enter.
- Check the battery level on the Code Jumper Hub (see “How do I know I need to change the batteries, and how do I change them?”).
- Check that the batteries are secure in the Hub.
Why isn’t Code Jumper making any sounds?
- Check the volume setting on the computer and the Code Jumper Hub. Make sure the sound is turned up and is not muted.
- Check where the sound is coming from, either the computer or the Hub.
- Check the connection between the Hub and the Code Jumper app (see “How do I know if the Hub is connected to the Code Jumper app?”).
- Check the battery level on the Code Jumper Hub (see “How do I know I need to change the batteries, and how do I change them?”).
- Check that the batteries are secure in the Hub.
How can I change which device my sound connects to?
On your computer, open the audio settings and change the desired playback device. (In Windows, click the volume icon in the task tray to access these settings.)
How do I connect headphones to Code Jumper?
It is not possible to connect headphones to the Code Jumper Hub. Headphones can be connected to the computer or tablet.
What can I do if sounds coming from the Hub or other Bluetooth audio devices are distorted?
Sounds coming from Bluetooth audio devices such as the Hub can sometimes be distorted. If that happens, change the playback device to a non-Bluetooth device. See “How can I change which device my sound connects to?”
Why don’t I hear a clicking sound when i plug in a command pod?
- Check the connection by unplugging the pod and then plugging it back in again.
- Check the battery level on the Code Jumper Hub (see “How do I know I need to change the batteries, and how do I change them?”).
- Check whether the code shows up in the Code Jumper app. If the color of the code is muted (faded out), there is a syntax error (see “Code Jumper burped—What does that mean?”).
Code Jumper burped—What does that mean?
When your pods are not correctly connected, it is called a syntax error and you will hear a burp sound. Common problems include:
- The loop is not closed. Both wires on the Loop pod need to be connected to either the Hub and a command pod or to two command pods. The loop needs to start and finish in the correct ports. Situate the Loop pod so that its two wires are on your left, and its two ports are on your right. The lower-right port is where the loop begins, and the longer wire is where the loop ends. The shorter wire is where the main program enters the loop, and the upper-right port is where the main program resumes.
- The Merge pod is not connected to the correct command pods. The Merge pod cannot connect command pods in different threads. That is, it cannot connect command pods that are connected to different ports on the Hub. The Merge pod works only when it is connected to the two command pods that are connected to the Selection pod.
- The Command pods were not connected to the Loop pod in the correct order. To connect them properly, first place the Loop pod with its shorter wire pointing to the upper-left and its longer wire pointing to the lower-left. Next, plug the first of the Command pods that you want repeated into the lower-right port of the Loop pod. After that, close the loop by connecting the longer wire of the Loop pod to the port on the last of those Command pods.
How do I know I need to change the batteries, and how do I change them?
- If you’ve turned on the Hub using its Volume dial and the light on the Hub is not on, the batteries are dead.
- To change the batteries, remove the battery cover from the bottom of the Hub, remove the old batteries, insert four new AA batteries, and then replace the battery cover.
- If you plug in a pod or plug properly but do not hear a clicking sound, the batteries might be dead.
- In a multi-thread program, if you press Play but only hear part of the program playing, the batteries might be almost dead.
- If you adjust dials on already plugged-in pods but the program does not respond, the batteries might be dead.
What should I do if the extender cable does not work properly?
To use this cable properly, connect pods to its port before connecting its plug end to other pods or the Hub.
Can I save my program?
- Code Jumper programs cannot be saved at this time. Let students know before they begin that they will not be able to save the program.
- Students with low vision might take pictures or screenshots of their programs when they are done as a way to save their work.
- Students who are blind might save their programs by taking notes.
- Allow enough time in the lesson or experimentation time to record their progress and programs.
6. Tips and Tricks
- Try putting the Play pods together in a straight line, so that Loop pods are an obvious offshoot.
- Trace the code by touching the pods as the sound for that pod is played. This helps strengthen students’ understanding of the programs.
- Remember to turn off the Hub when you are finished using the kit. This is important to save the batteries.
- Putting a piece of felt on the desktop may help reduce classroom noise and prevent parts from slipping.
7. Frequently Asked Questions
Why is coding important?
Educators around the world are striving to help students prepare for the ever-changing digital age. Knowledge about computer science is necessary to help students proceed with competence into their future careers, and programming is a key part of that. It is estimated that over half the current workforce requires a high level of digital skills, which can include financial modelling, content creation, and social media analysis. In addition to this, 50% of top paying jobs in the U.S. require at least some coding skills (Beyond point and click: The expanding demand for coding skills, 2016.
Retrieved from https://www.burning-glass.com/wp-content/uploads/Beyond_Point_Click_final.pdf).
What is computational thinking?
Computational thinking is also becoming increasingly important in the workplace. This process has been identified as one of the 10 key work skills that will be needed by workers in 2020. Computational thinking is an approach to problem solving that is used by computer scientists, but it applies equally to a wide range of disciplines.
Computational thinking includes:
- The ability to break a problem down into separate parts
- The ability to recognize and identify patterns and trends
- The ability to identify multiple possible solutions to a problem
- The ability to develop a solution to a problem
Why is it important to support learning to code for students with a visual disability?
Digital skills and technology can be very empowering. However, there is still a divide between those who have access to technology and the skills to use them and the ones who do not. For example, according to a Pew Research Center survey conducted in the fall of 2016. Americans with disabilities are about three times as likely as those without a disability to say they never use the Internet (23% vs. 8%). When compared with those who do not have a disability, adults with disabilities are roughly 20 percentage points less likely to say they subscribe to home broadband and own a traditional computer, a smartphone, or a tablet. (Anderson, M. & Perrin, A., 2017, April 7. Disabled Americans are less likely to use technology [blog post].
Retrieved from https://www.pewresearch.org/fact-tank/2017/04/07/disabled-americans-are-less-likely-to-use-technology/)
Substantial effort has gone into the creation of tools to teach students how to program. Scratch, a visual block-based language, is perhaps the most widely used. The existing languages are highly visual in nature, both in manipulating the code (e.g. drag and drop) and in the effect that the code has (e.g. animation, moving a robot). As such, they are not appropriate to students with a visual disability. Code Jumper provides students with visual disabilities an appropriate entry point to coding. This will hopefully help those students acquire the skills necessary for a modern workplace.
Does Code Jumper support learning standards?
Code Jumper supports elementary school students in the development of the core practices identified in the K–12 Computer Science Framework*, which include:
- Fostering an inclusive computing culture
- Collaborating around computing
- Recognizing and defining computational problems
- Developing and using abstractions
- Creating computational artifacts
- Testing and refining computational artifacts
- Communicating about computing
8. Try It Yourself!
- Connect three Play pods together and then attach them to the Hub.
- Play pre-loaded sounds. Choose the kinds of sounds you want to hear by selecting the sound category and sound set in the Code Jumper app. Each port on the Hub has sounds assigned to it that correspond to the columns in the Code Jumper app. This determines the specific sounds that will be available to use with the command pods connected to that port on the Hub.
- Press the Play button. When the program runs, three sounds will play, beginning with the sound from the pod connected directly into the Hub and moving sequentially to the pod furthest away.
- Read the code by pressing Play and Pause on the Hub simultaneously.
- Each time a Command pod is connected to the Code Jumper Hub, a line of code will be added to the Code Jumper app. Below is an example of what the code could look like for a program that plays three sounds.
Thread 1 Piano
PLAY C5 for 1/2 beat
PLAY D5 for 1/2 beat
PLAY E5 for 1/2 beat
End Thread
- As practice, encourage students to read the code shown in the Code Jumper app (which can be done via a screen reader) after creating the physical components with the Code Jumper kit. As students progress in their understanding, they can design a program by writing or touch-typing code before trying to use the Code Jumper kit.
- Playing sounds simultaneously:
Connect a set of Command pods to two ports on the Hub. The program will play the sounds from both sets at the same time. This is called threading, and each set of commands is called a thread. Port 1 on the Hub corresponds to Thread 1 in the Code Jumper app, Port 2 for Thread 2, and so on. Threading enables students to create programs that feature different types of sounds playing at the same time, such as the melody and harmony for a song.
Now Try Creating This Program.
(If you need some hints, look at the solution below.)
Thread 1 Twinkle, Twinkle
Play Twinkle 1 for 1.5 times speed
Play Twinkle 2 for 1.5 times speed
Play Little for 1.5 times speed
Play Star for 1.5 times speed
End Thread
Solution:
- Click the white box adjacent to Thread 1 and select the Sample Sounds sound category and the Twinkle, Twinkle sound set.
-
- Connect four Play pods together and then plug the thread into Port 1 on the Hub.

- Turn the Sound dial on the first Play pod until you hear the word Twinkle.
- Check the code in the Code Jumper app to make sure the first Play pod plays “Twinkle 1”, as there is more than one Twinkle sound.
- Adjust the speed to 1.5 by turning the Duration dial of the first Play pod.
- Read the code displayed in the Code Jumper app to ensure it reads “for 1.5 times speed”.
- Repeat steps 3-5, above, until you’ve set the sounds for all four Play pods.
- Run the program by pressing the Play button on the Hub.
- Press the Play and Pause buttons on the Hub simultaneously to listen to your code.
FCC Compliance Statement:
Changes or modifications not expressly approved by the party responsible for compliance could void the user’s authority to operate the equipment.
This equipment has been tested and found to comply with the limits for a Class B digital device, pursuant to Part 15 of the FCC Rules. These limits are designed to provide reasonable protection against harmful interference in a residential installation. This equipment generates, uses and can radiate radio frequency energy and, if not installed and used in accordance with the instructions, may cause harmful interference to radio communications. However, there is no guarantee that interference will not occur in a particular installation.
If this equipment does cause harmful interference to radio or television reception, which can be determined by turning the equipment off and on, the user is encouraged to try to correct the interference by one or more of the following measures:
-- Reorient or relocate the receiving antenna.
-- Increase the separation between the equipment and receiver.
-- Connect the equipment into an outlet on a circuit different from that to which the receiver is connected.
Consult the dealer or an experienced radio/TV technician for help.
ISED Compliance Statement:
This device contains licence-exempt transmitter(s)/receiver(s) that comply with Innovation, Science and Economic Development Canada’s licence-exempt RSS(s). Operation is subject to the following two conditions:
- This device may not cause interference.
- This device must accept any interference, including interference that may cause undesired operation of the device.
RF Exposure Compliance Statement:
This equipment complies with FCC/IC radiation exposure limits set forth for an uncontrolled environment. This transmitter must not be co-located or operating in conjunction with any other antenna or transmitter.
Thank you for purchasing CODE JUMPER!
Requires 4 x 1.5V “AA”/LR6 alkaline batteries (not included).
Phillips/cross head screwdriver (not included) needed to insert batteries.
To begin playing with your Code Jumper, you must first install batteries.
TO INSTALL BATTERIES
Use a Phillips/cross head screwdriver, loosen screw in battery compartment cover (screw stays attached to cover) on the bottom of Hub. Insert 4 X 1.5V “AA”/LR6 alkaline batteries.
Replace cover and tighten screw.
CAUTION: TO AVOID BATTERY LEAKAGE
- Be sure to insert the batteries correctly and always follow the battery manufacturers’ instructions;
- Do not mix old batteries and new batteries or alkaline, standard (carbon-zinc) or rechargeable (nickel-cadmium) batteries;
- Always remove weak or dead batteries from the product.
IMPORTANT:
Please retain this information and all the packaging for future reference.
Batteries should be replaced by an adult.
CAUTION:
- Always follow the instructions carefully. Use only batteries specified and be sure to insert item correctly by matching the + and – polarity markings.
- Do not mix old batteries and new batteries or standard (carbon-zinc) with alkaline batteries.
- Remove exhausted or dead batteries from the product.
- Remove batteries if product is not to be played with for a long time.
- Do not short circuit the supply terminals.
- RECHARGEABLE BATTERIES: Do not mix these with any other types of battery. Always remove from the product before recharging. Recharge batteries under adult supervision.
DO NOT RECHARGE OTHER TYPES OF BATTERIES.
Catalog No. 1-02700-00
For more resources, including a teaching curriculum, visit codejumper.com
Copyright © 2020
![]()
American Printing House for the Blind
1839 Frankfort Avenue
Louisville, KY 40206
Phone: 502-895-2405
Toll Free: 800-223-1839
Fax: 502-899-2284
E-mail: [email protected]
Website: www.aph.org